Friday, May 30, 2014

Attract Butterflies and Bees with Milkweed

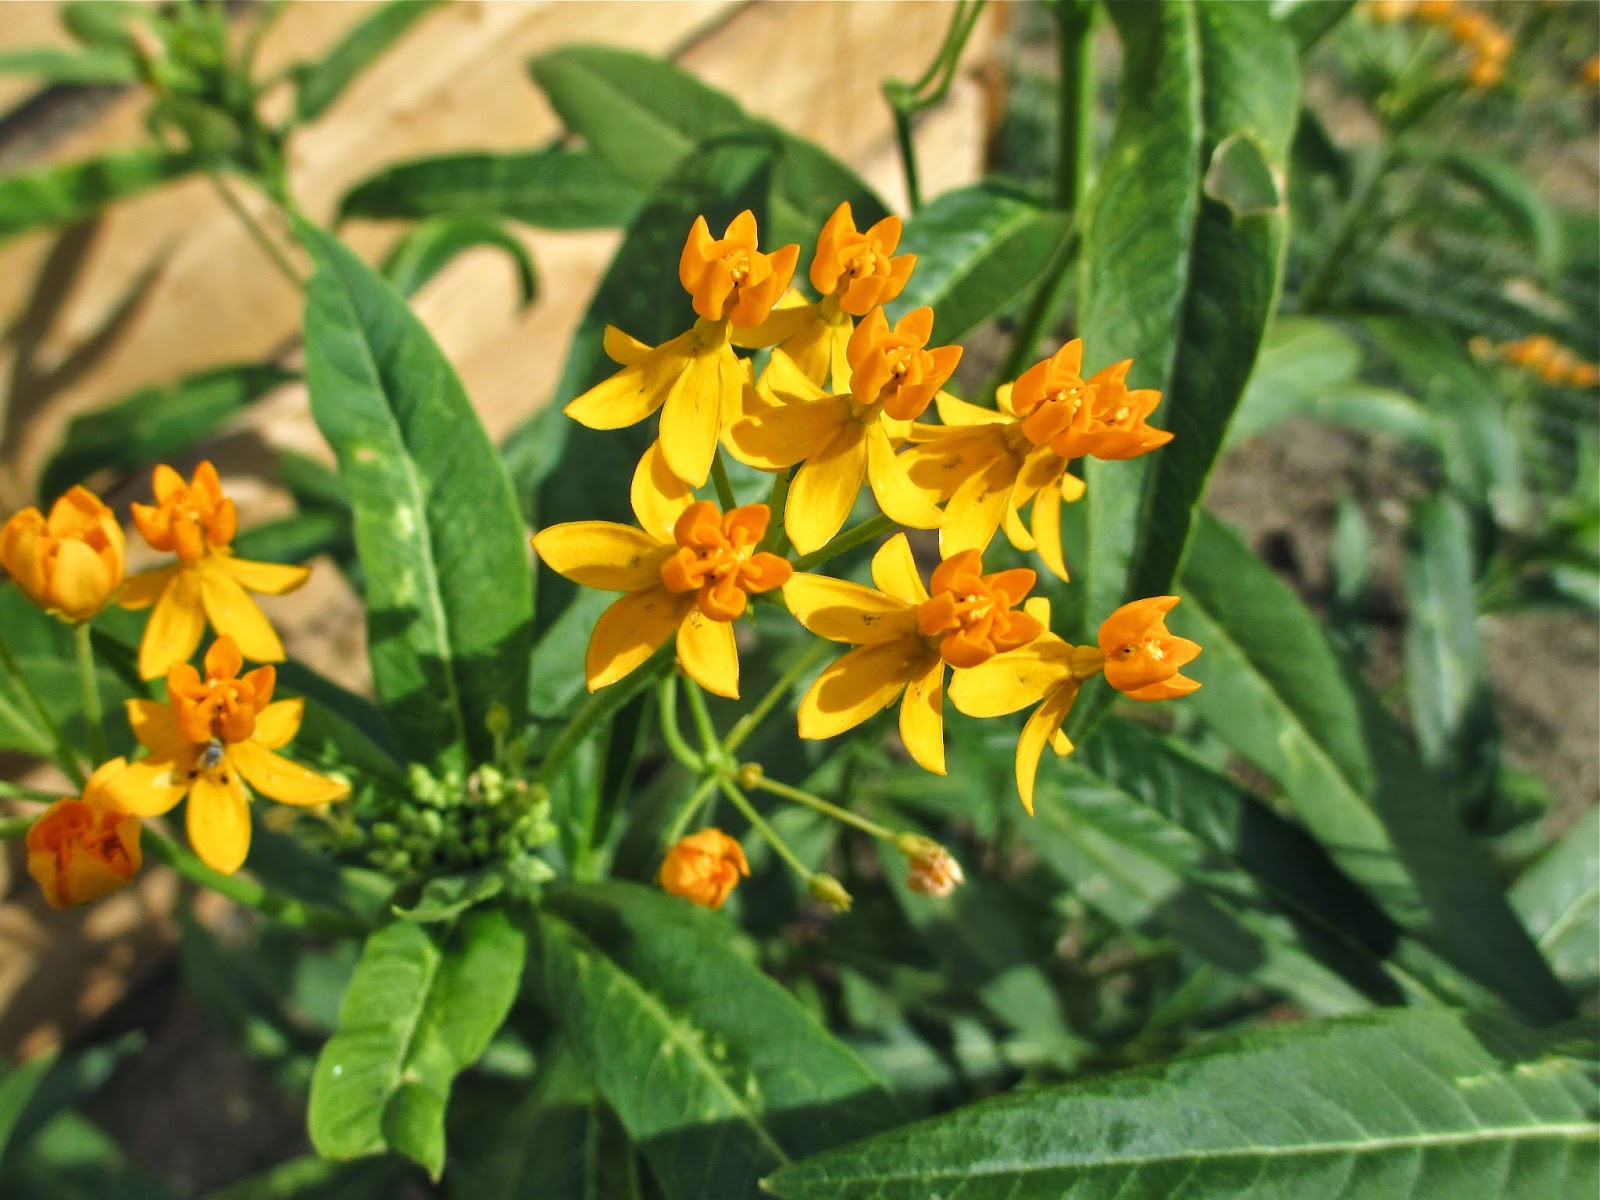
Silky Gold Milkweed
Asclepias curassavica
When I told my dad I planted a milkweed to attract butterflies he was shocked. He's a Nebraska farm boy and he tells me in those parts milkweed is an issue for farmers. He told me to take it out or it will spread its seeds and they will be popping up all around. "That's why they call it a weed." Words of wisdom from my father.

Too late. It's planted. And it is so pretty. The pollinators are all over it. One monarch butterfly fluttered around when I was out there yesterday. And today in the 5 minutes I spent taking these picture, there were lots of winged visitors.
Wasp, arriving from the right, camouflaged against the leaf.
Ladybug
In those few minutes there were two ladybugs, two bees and one wasp. I guess they like milkweed.

I find the flowers fascinating.

They are fabulous yellow whirligigs suspended in clusters. 
From below they are fireworks.
Or garden fairies dancing in the breeze beckoning butterflies with buttercup skirts.


Thursday, May 29, 2014

Jacaranda Tree - It's a Beauty

When nature offers a spectacle like this, one must take a moment to treasure it. What a beautiful tree!

This jacaranda makes my heart happy. How lucky I am to walk out my back door to this view.
It is majestic, probably 60 ft high, one of the tallest I've seen, and every May it brings joy to my world.

I have been spending as much time as possible enjoying the jacaranda while it's blooming, having morning coffee on the deck, reading on the patio, and of course puttering in my garden. 

Joy is found in those quite moments when I stop and really focus on the beauty nature shares. Pausing to let the beauty sink in, to let it move me. And this tree moves me. 

There is a street in our area covered in a canopy of purple. These pictures don't do it justice but I had to share the show.


This is one pretty mess. The flowers drop to create a lovely carpet of purple, something lovely to see on the lawn. 
Not so lovely on your car or driveway because they are sticky. My husband said tonight that his favorite jacaranda is one growing in someone else's yard. This one we prefer to enjoy from afar, so thanks to our neighbors for dealing with the mess and letting us enjoy the spectacle from here.


Wednesday, May 28, 2014

Beautify an Ugly Fence with Bower Vine

Yes, I prefer pretty pink flowers to chain link fence any day.

My fence needed help. Actually it needed to be replaced, but buying a couple of bower vines was much cheaper than a new fence. Now no one knows that we have an ugly fence, it's our little secret.
The bower vine and jacaranda look beautiful together. Both are in full bloom right now and the sight is a major distraction from the work that should be done.

Who can blame me for gazing at the purple and pink flowers instead of pulling weeds?

Bower vine is one of my favorite vines. In my garden, it looks lovely all year. Even when it's not in bloom the foliage is pretty; green, shiny, vigorous yet delicate, and disease resistant.

This is a vine which will cover a fence nicely with a little training, but it doesn't really get out of control like honeysuckle. 

For such a vigorous plant, it is not very messy. It's a no-fuss kind of plant. I never do anything to mine; basically no pruning, no pest control, no fertilizer. It just performs beautifully year after year. It is getting a bit big so I will probably have to prune it soon. It's been pruned one other time many years ago.

And when the light catches the flowers, they seem to glow.
As I was taking these pictures I was reminded of the day many years ago when my daughter in her little 5 year old voice said that our house reminded her of Madeline's. Madeline was one of my daughter's favorite children's book characters.

"In an old house in Paris that was cover with vines, 
lived twelve little girls in two straight lines
They left the house, at half past nine...
The smallest one was Madeline."
-John Bemelmans

Oh, hearing that from my little one warmed my heart, and remembering it today made me smile.

Tuesday, May 27, 2014

Angelonia - A Favorite for Windowboxes

Angelonia augustifolia 
Angelonia, these pretty little flowers are reminiscent of snap dragons, but more dainty. Their buds are delicate orbs held high above the plant which grows 10 to 18 inches tall. The leaves are long and pointed.
Angelonia is also known as summer snapdragon. Like snapdragons, they have many little flowers on each stalk. They are shades of purple, pink and white with contracting colors at their throats.

Looking closely at the flowers I am reminded of someone laughing loud enough to loose their bottom denture. Maybe I should have kept that thought to myself...
One of the things I love about this plant is that it tolerates the heat, and here in the Los Angeles area, things can really heat up in the summer. Mine are planted in my window boxes which have been known to dry out more often than they should. This does not phase the angelonia, although it does prefer moist, well-drained soil.

They are perennials often treated as annuals. The only pest mine have is spider mites. Oh, those dreaded little critters get on everything. So I try to spray them off with water weekly and give them a spritz with soapy water to keep the mites controlled.

They bloom for a long period, all summer producing their laughing flowers for my enjoyment.

Sunday, May 25, 2014

Fence and Simple Gates - Removes Easily for Gardening - Andie's Way

This fence removes easily to allow access to your garden beds. 
My 75 ft fence with 5 gates cost less than $100. It is made of 28 inch rabbit fencing, 3 ft metal garden posts, 1 x 2 inch furring strips, and simple eye hook gate latches.
Simple double gate
When designing my garden I knew a fence would be necessary because of my friend, Bessie May.

Now Bessie is not a dog who jumps fences. She is well-mannered so this fence keeps her out of my garden. It's not sturdy enough to keep out a determined dog. Luckily for me it also works for my father's smaller Brittany spaniel. 

When designing my garden I realized I wanted several gates for easy access. I also wanted to be able to remove the fence along the pavement because I did not leave room for a path, so the fence runs right along the edge of the bed. 

This is how to make it work. 

First measure the perimeter of the garden to know how much fencing to buy. 

Decide how many gates you want and where they will be located. This determines how many furring strips and latches are needed. At each gate there is one 28 inch furring strip, 2 eye hook gate latches (one higher and one lower on the post), 2 eye screws with 2 matching nuts. You will also need some twist ties or wire to secure the fencing on the metal posts where there is no gate, as well as wire cutters and pliers. 

The eye screw is placed through a hole in the post and it is held on by a nut.
The eye screw can accommodate two latches so it works great for a double gate where both sides open.
Next determine how many metal posts are needed. Mine are spaced approximately every 6 ft. There is one post at every gate. Buy the typical garden stakes with the "T" stabilizing bar at the bottom, and holes for the eye screws. Mine are 36 inch stakes.

Probably the hardest part of this project was unrolling the wire fencing. It wants to roll back up so consider this when you put up the fence. I wanted my gates to open outward so I put up the fence so that the natural bend of the wire will make it open outward. After a year the fence still wants to curl so the gates open very easily when unlatched.

Starting at one end, cut the fencing so that the horizontal wires are long enough to wrap around the 1 x 2 inch furring strip. Bend the wire around the wood strip and back over the wire to secure the 1 x 2. You want the wire to be wrapped tightly around the wood so the furring strip does not slip up and down inside the wire.
Pound the stake into the ground and place the eye screws into the holes then secure them with nuts. Then line the end of the fence with the metal post to determine where to screw the gate latch into the wooden furring strip. Progress along the perimeter of your garden. I like to secure my fence to the metal stakes using twist ties. They make it easy to remove the fence for weeding.

This simple fencing method is inexpensive and versatile. Made Andie's Way.


Thursday, May 22, 2014

Taming the Tomatillo - Bamboo Trellis

Tomatillo spreading.
Around here, we love green salsa. My husband is a fabulous cook and his enchiladas suizas are just amazing. And there's nothing like fresh tomatillos to make a great chili verde.

Tomatillos are easy to grow here in my Los Angeles area garden. The problem is they get out of control. Fast. One day the plant looks robust, then suddenly it's taking over. I had to do something or my poor peppers and cucumbers would be stifled.

Being indecisive about what type of support to make, I mulled it over in my head. A couple of weeks went by and the rogue plants kept creeping over the cucumbers toward the tomatoes. Today was the day I had to do something.

I had 3 bamboo poles purchased previously at a garden center, but that didn't seem like it would be enough support.

Luckily I have some bamboo planted in pots along a fence. And as it turns out, bamboo needs occasional fertilizer to thrive in tubs. Mine are a bit deprived, so today there were plenty of dead stalks for the taking.

Originally I thought I would break off the side branches to make nice smooth bamboo poles like the ones I bought. Wrong. That stuff is tough. It doesn't break or cut easily.

Then it occurred to me to just stick it in the ground as is.
Before

After


Worked like a charm. All those little side branches hold the vines beautifully. Why didn't I think of that before? They are the perfect little trellis makers, and they are right in front of me.

Sometimes the most obvious things are the hardest things to see.

So much to discover. And now my cucumbers can see the light too.

http://andiesway.blogspot.com/2014/05/taming-tomatillo.html


Wednesday, May 21, 2014

What We're Eating Today - Strawberries

Yum! Strawberries. The sweet little gifts, could they be any cuter? They are such happy looking fruits. The color is even a cheery red.

And I love the way they look suspended from their dainty stems beneath green lobes. They invite you to pick them.

I have only one variety, Sequoia. From 12 plants, I consistently get a half dozen beautiful berries a day, enough for a smoothy or nice little dish of sliced berries.

My grandma used to make sliced strawberries with sugar and whipped cream for dessert. Oh my, the juice in the bottom of the bowl was heavenly!

Tuesday, May 20, 2014

Sweet Bessie May


Bessie May Mucho - named after the song "Beseme Mucho" which means 'kiss me a lot' in Spanish.
She is my friend, sweet Bessie May. She's my hiking buddy, my ball-obsessed, enthusiastic partner in life. Just look at that happy dog.

This one is special. She understands everything I say. Never have I had a dog with such comprehension of our language.

When her dinner time draws near, she comes to me, begging like any dog. If she is early I will tell her, "It's not time yet." She walks away. When we are working together in the front yard and it's time to leave, she knows if we're going in the front door or around the side gate. She knows because I tell her, and she understands. Seriously, she gets it. All of it.

Sweet Bessie May even thanks us for dinner. After she eats she searches throughout the house to find the person who fed her. She seeks us out and comes right up and says thank you - every time. This girl touches my heart.

She's rarely destructive. How many young labs do you know who could be trusted to walk through the garden and stay on the pathways? When I open one of the little garden gates, she waits to be invited into the garden. I never taught her to wait, she just does.

Now if there's a lizard around, all bets are off. If you're a lizard, you have to be chased. No manners will ever interrupt that impulse.

Smart, athletic, sensitive, intuitive. If only I could get her to be calm when people visit, that would be something.

We all love our dogs. For those of us who have furry friends, it needs no description, this friendship we share.
Happy is the labrador who plays with the hose.
Bessie came into our lives as our children went to college. My worry was that I would be lonely, a little lost after years of being busy with them and my volunteer work at their schools. So I decided to get a dog, someone to take on hikes; a friendly distraction, a companion. A local football coach was having a litter of labs. I chose Bessie.

She is priceless, a true friend who is with me every step as I find my way.

Sunday, May 18, 2014

Tomato and Bean Trellis - Andie's Way. It comes apart for storage.


Looking for a sturdy tomato or bean trellis? Why not make your own? 

Perhaps last year your tomatoes outgrew their little wire cages you bought at the hardware store and you want to give them more room to grow this year. This trellis is 7 ft high and spans 6 ft over my garden pathway providing plenty of room to grow. 

The trellis is made so it can be taken apart for storage. The 2 cross boards at the top can be unbolted so that the 2 side parts can be set against each other to take up less space when stored.

Here's what you need:

Lumber (see below)
(12) 3 inch wood screws 
(4) corner brackets
(4) 4 inch bolts, with 4 matching nuts and washers
Twine
Wire
Drill, drill bits
Carpenter's square
Tape measure
Screwdriver
Level

Lumber: Use untreated lumber.  Treated lumber has chemicals which can contaminate the soil.

These are the measurements I used, make adjustments to fit your needs.

(4) 2 x 4's  8 ft long. These are the vertical posts.
(2) 2 x 4's  4 ft long. These are the top pieces that connect the vertical posts and hold the twine.
(2) 2 x 2's  4 ft long. These are the bottom pieces that hold the twine.
(2) 2 x 4's  8 ft long. These are the pieces that are bolted across the top to connect the 2 side parts completing the trellis.

First you will make 2 side parts which will look like this. These will hold the twine.

Drill holes every 6 inches in the top pieces. Use a large diameter drill bit so that you can pass the twine through the holes.

In the vertical posts, drill a hole 1 inch from the top. This is the hole for the bolt so use the correct size drill bit to match the bolt.

Then drill a hole for twine every 6 inches matching the holes in the top pieces.

Make your last hole in the vertical pole 23 inches from the bottom. (It doesn't have to be exactly 23 inches since the bottom ends will be buried.) 

Arrange the wood on a flat surface and screw the top piece to each vertical post using 2 screws on each side. Use a carpenter's square to be sure it is at a 90 degree angle. 

Then screw the corner brackets inside the corners. Note that the bracket is not centered so the hole is left uncovered. (This is the hole that the bolt goes through.)

Now screw the bottom piece (2 x 2) to the vertical posts 20 inches from the bottom. Again use the carpenter's square to be sure it is at a right angle to the vertical posts.

Next you string the twine through the holes. I found if I taped the twine to a twig it made it easier to push the twine through the holes. 


Don't sting the twine through the top hole on the vertical posts. This top hole is for the bolt which holds the cross piece (see below).

Next I used wire to make cross supports to keep everything stable and square.


Once you have made two of these side parts, you are ready to connect them. Bolt the top cross pieces to the vertical posts. You will need to drill a hole through the top cross piece to line up with the top hole in the vertical post that you previously drilled. I definitely needed a second set of hands for this part.


Honestly, the most difficult part of making the trellis was making sure it was level and the posts were vertical when it was placed in the garden. I recruited the help of my husband and son and we used the level.

To be certain the trellis is stable I buried 12 inches of the vertical posts, then I attached guide wires to my raised beds using eye screws. 


Here is what my trellis looks like today. Tomatoes are planted on one side and pole beans on the other. If the vines grow long enough I will string twine across the top to support the vines over the top.


There you have it, tomato and bean trellis - Andie's Way.